
How to Integrate Shopify for WhatsApp Automation in ChatSyncs
How to connect a Shopify store to ChatSyncs from Chatbot Manager → Commerce → Store Automation, so order events can trigger WhatsApp messages.
On this page
Connecting Shopify lets ChatSyncs react to what happens in your store — an order placed, confirmed, or cancelled — and turn it into an automatic WhatsApp message to the customer.
- Order updates
- Cart reminders
- Customer support tied to a real order
- Marketing automation
Connect your store#

Open Store Automation
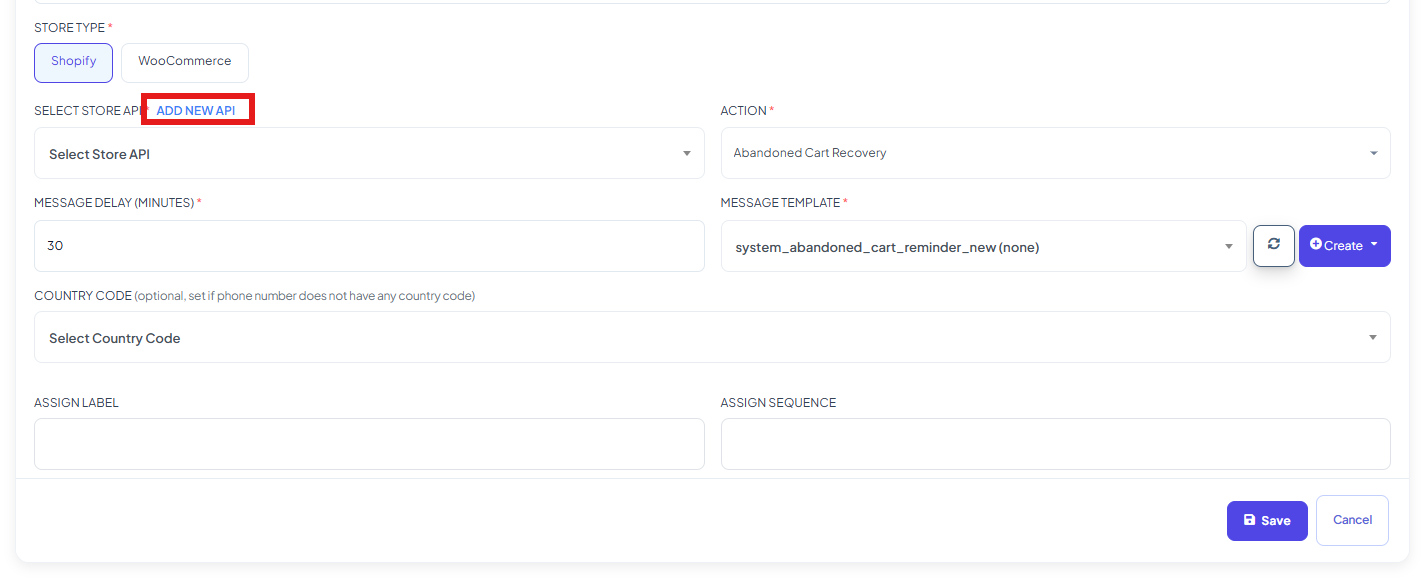
Go to Chatbot Manager → Commerce → Store Automation, and set Store Type to Shopify.
Click Add New API
Next to Select Store API, click Add New API.
Fill in the E-commerce API form
ChatSyncs opens the E-commerce API panel with Shopify (Legacy) selected. Fill in:
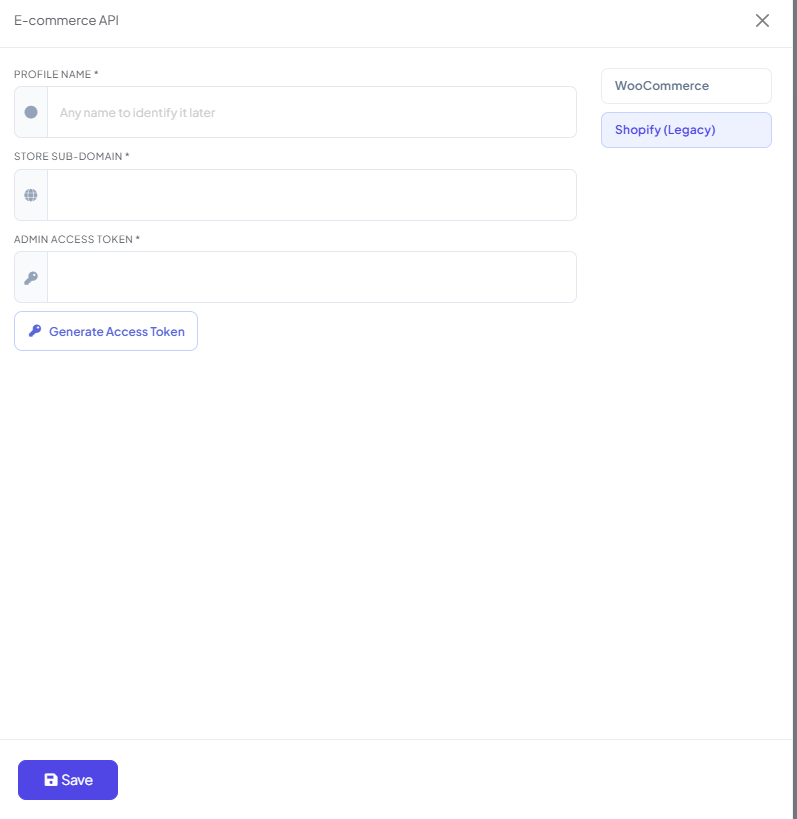
- Profile Name — any name to identify this store later.
- Store Sub-Domain — your Shopify store's subdomain.
- Admin Access Token — see below for how to generate it.
Save
Click Save. The store now appears in Select Store API for use in automation campaigns like Abandoned Cart Recovery.


Get the Shopify Admin Access Token#
Open your Shopify Admin Panel
Log in to your Shopify store's admin panel.
Go to Develop Apps
Navigate to Settings → Apps and Sales Channels → Develop Apps.
Create an app
Click Create an App, enter a name, and confirm by clicking Create App.
Grant API scopes
Go to Configure Admin API Scopes and grant read and write permissions for:
- Order Editing
- Orders
Click Save.
Install the app
Under API Credentials, click Install App, then Install.
Reveal and copy the token
Click Reveal Token Once and copy the Admin Access Token — you won't be able to see it again after leaving this screen.
Paste the token into the Admin Access Token field back in ChatSyncs and click Save to complete the connection.
What you can automate once connected#
- Confirm Order and Cancel Order — system default action buttons that fire from Shopify order events. See How to Set Up Quick Actions (No Match, Get Started, and More) for the full detail on these two buttons.
- Order and shipping updates via Webhook Workflow — send a WhatsApp template automatically whenever Shopify posts an order event, using the Shopify order update shortcut in the AI Workflow Assistant. See Webhook Workflow for the full setup.
Frequently asked#
Where do I connect my Shopify store to ChatSyncs?
Chatbot Manager → Commerce → Store Automation, set Store Type to Shopify, then Add New API and fill in the E-commerce API form.
Do I need Shopify to use Confirm Order and Cancel Order buttons?
Yes — those two action buttons are system defaults that only fire from a connected Shopify or WooCommerce store's order events. If you don't use either platform, you don't need to configure them.
How do I send a WhatsApp message automatically when a Shopify order updates?
Use Webhook Workflow — its AI Workflow Assistant has a dedicated Shopify order update shortcut to help map the order data to a message template.
Where do I get the Store Sub-Domain and Admin Access Token?
The Store Sub-Domain is your Shopify store's subdomain. The Admin Access Token is generated from your Shopify Admin Panel — see Get the Shopify Admin Access Token above.
Was this page helpful?
Still stuck? Open a support ticket and our team will help.