
How to Connect a Bot Flow to External Systems in ChatSyncs
How a bot flow calls an outside system mid-conversation, and how to send data out to Google Sheets, a CRM, or your own server automatically.
On this page
Two related ways to connect a bot flow to the outside world:
- HTTP API — the bot calls out to your own system mid-conversation and uses whatever it returns, e.g. an order status.
- Outbound Actions — ChatSyncs pushes data out automatically the moment something happens in a conversation, e.g. a form submission.
Example (HTTP API): A customer types their Order ID. The bot calls your Order API, gets back
{"status": "Shipped", "tracking_id": "BD987654321"}, and replies "Your order has been
Shipped. Tracking ID: BD987654321" — instantly, no human involved.

Where HTTP API is used:
- Directly inside a Keyword Replies flow, to look something up mid-conversation.
- Inside a WhatsApp Flow's Select HTTP API field, to send a submitted form to your system — see WhatsApp Flows.
Outbound Actions: send data out automatically#
An Outbound Action sends data out of ChatSyncs the moment something happens — a subscriber submits a form, clicks a button, or shares their location.
- Instead of that data staying locked inside ChatSyncs, it's forwarded automatically.
- Send it to Google Sheets, a CRM, your own server, Zapier, Make.com, Airtable, or any other place that can receive it.

Example: send Input Flow submissions to Google Sheets#
Say you built a Customer Registration Form using an Input Flow or WhatsApp Flow with fields for Full Name, Phone Number, Business Type, Service Interested, and Demo Date. When a subscriber submits it, an Outbound Action can push that submission straight into a Google Sheet — no manual copying, no server of your own required. The rest of this section walks through that exact setup, since it's the most common use case.
User submits WhatsApp Flow or Input Flow
            ↓
ChatSyncs Triggered
            ↓
Outbound Action
            ↓
Google Apps Script
            ↓
Google Sheet
            ↓
Columns Created Automatically
            ↓
Data Stored Automatically
Set up Google Sheets as the destination#
Create a Google Sheet
Create a new, empty Google Sheet. You don't need to add any columns — they're created automatically later.
Open Apps Script
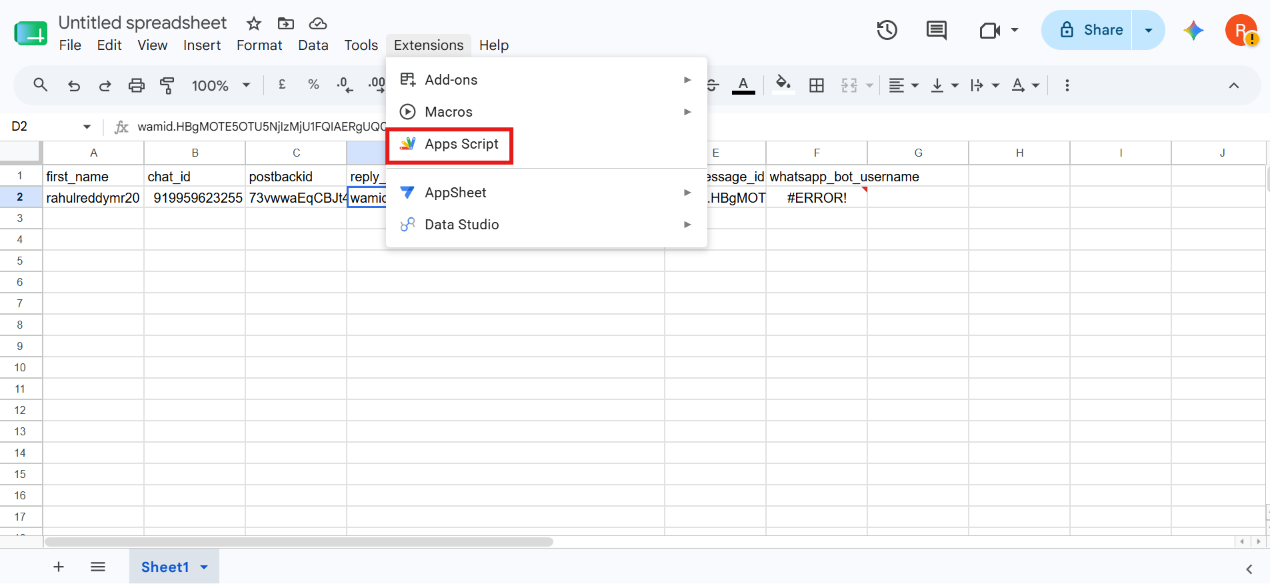
Inside the sheet, go to Extensions → Apps Script.
Paste the script
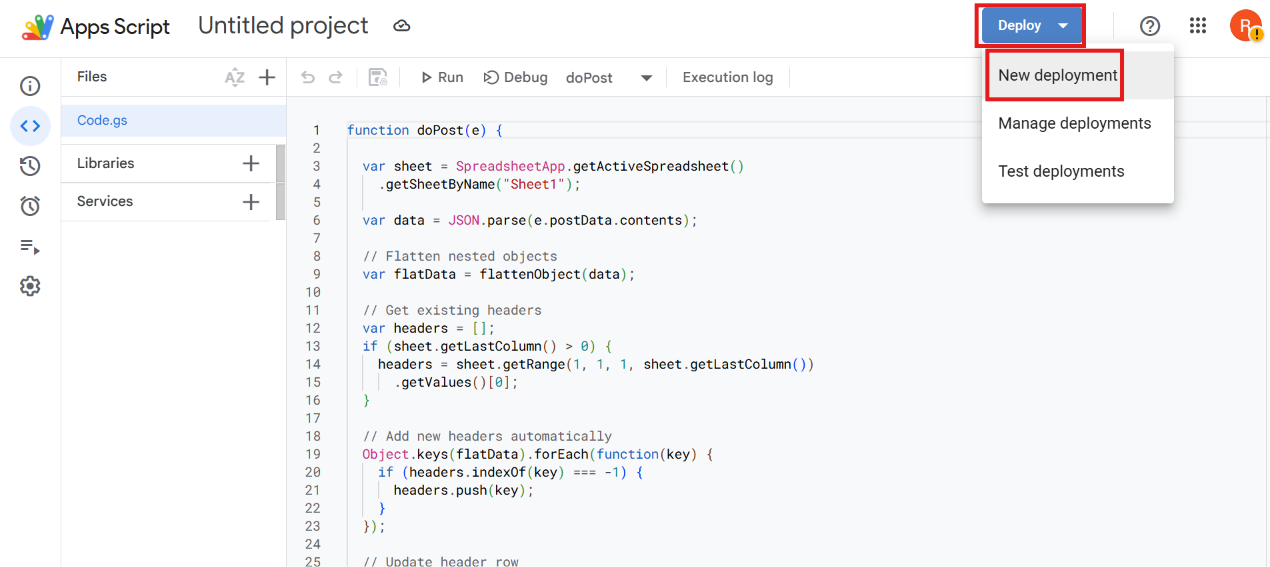
Delete any existing code and paste a
doPost(e)function that reads the incoming webhook payload and appends it as a row — creating header columns automatically the first time each field name is seen:function doPost(e) { var sheet = SpreadsheetApp.getActiveSpreadsheet().getActiveSheet(); var data = JSON.parse(e.postData.contents); var headers = Object.keys(data); if (sheet.getLastRow() == 0) { sheet.appendRow(headers); } var values = headers.map(function(key) { return data[key]; }); sheet.appendRow(values); return ContentService .createTextOutput("Success") .setMimeType(ContentService.MimeType.TEXT); }Deploy as a Web App
Click Deploy → New deployment, set Select type to Web app, Execute as to Me (your Google account), and Who has access to Anyone (or Anyone with the link) — not Only myself, or ChatSyncs won't be able to reach it. Click Deploy and authorize the requested Google permissions.
Copy the Web App URL
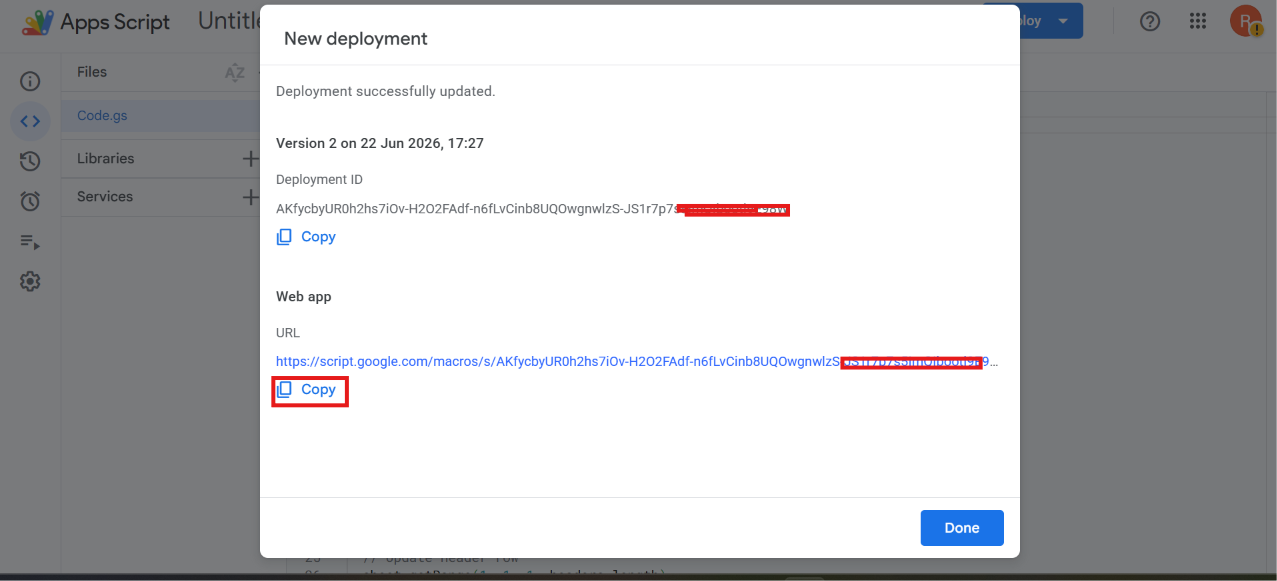
Google gives you a URL like
https://script.google.com/macros/s/XXXXXXXXXXXX/exec. Copy it — this is your webhook URL.


Create the Outbound Action in ChatSyncs#
Go to Chatbot Manager → Automation → Outbound Actions → Create, then fill in one form covering the webhook, its triggers, and the data it sends:

- Webhook Name — e.g.
Customer Registration Data. - Out-bound Webhook URL — paste the Web App URL you copied above.
Select the trigger(s) — Unlike separate configurations per event, Postback, User Input Flow, and Location are all toggles on this same form — turn on whichever one(s) should trigger this webhook. Whenever an enabled action happens, ChatSyncs sends the data to that particular webhook URL:
- Postback — fires when a subscriber clicks a postback button. Pick which postback(s) in Select Postbacks.
- User Input Flow — fires when a subscriber submits an Input Flow. Pick which flow(s) in
Select Input Flows (e.g.
Appointment Booking,Customer Registration Form). - Location — fires when a subscriber shares their live location.
You can enable more than one trigger on the same Outbound Action — each fires independently and sends to the same configured webhook URL.
Select fields to send — Enable whichever fields you need: Subscriber ID, Subscriber Name, Phone Number, Date of Birth, Location, Labels, Postback ID, Input Flow Data.
Click Save — the webhook is now active.
How automatic columns work#
Whenever a webhook payload arrives, the Apps Script reads its JSON keys and adds any column that doesn't already exist — you never edit the sheet by hand. For example, a payload from a Postback trigger like:
{
  "first_name": "Rahul",
  "chat_id": "919959623255",
  "postbackid": "73vwwaEqCBJt...",
  "reply_message_id": "wamid.HBgMOTE5..."
}
produces the sheet shown above, with first_name, chat_id, postbackid, and
reply_message_id as columns, populated automatically — no manual setup per field.
If you add a new field later (e.g. budget), the next submission that includes it
automatically gets its own column — no need to edit the sheet first.
Real business examples#
| Use case | Fields collected | Destination |
|---|---|---|
| Lead Collection | Name, Phone, Business Type | Google Sheets |
| Appointment Booking | Name, Date, Time | Google Sheets |
| Property Enquiry | Name, Phone, Property Type, Budget, Location | Google Sheets |
| AI Automation Agency | Name, Company, Service Required, Monthly Budget | Google Sheets |
This is the simplest and most common way to connect a ChatSyncs WhatsApp Flow or Input Flow directly to Google Sheets without running your own server — the same approach works for any endpoint that accepts an HTTP POST, including a CRM, Zapier, Make.com, or Airtable.
Manage Outbound Actions#

Saved webhooks appear in the Outbound Actions list with three actions:
- View Report — see webhook logs and activity, and check whether data was sent successfully.
- Edit — update the webhook URL, triggers, or selected data fields at any time.
- Delete — permanently remove the webhook; ChatSyncs stops sending it data immediately.
Frequently asked#
Can my bot look up a customer's order status automatically?
Yes — connect your order API under HTTP API, map its response fields to variables, then use those variables in the bot's reply.
Is HTTP API the same as Outbound Actions?
Related but different. Outbound Actions push data out when something happens (a form submission, a button click). HTTP API is used inside a flow to call out and get data back mid-conversation.
How do I send WhatsApp form submissions to Google Sheets automatically?
Deploy a Google Apps Script doPost web app on the target sheet, copy its URL, then create
an Outbound Action in Chatbot Manager → Automation with that URL, turn on User Input
Flow (or Postback / Location), and make sure Input Flow Data is turned on.
Can I trigger the same webhook from more than one event?
Yes — Postback, User Input Flow, and Location are all toggles on the same Outbound Action form, not separate configurations. Enable as many as you need; each fires independently and sends to the same webhook URL.
Why isn't my Google Sheet receiving any data?
Check three things: the Apps Script deployment's Who has access is set to Anyone (not "Only myself"), the Out-bound Webhook URL in ChatSyncs exactly matches the deployed Web App URL, and the right trigger/fields are enabled. Use View Report on the webhook to see whether ChatSyncs is sending anything at all.
Why are my form answers missing even though the webhook fires?
The Input Flow Data field toggle is probably off. Without it, the webhook still fires and sends subscriber metadata, but not the actual question answers.
Do I need to manually create columns in my Google Sheet?
No — the Apps Script reads the JSON keys in each payload and adds any missing column automatically, including for new fields you start sending later.
Can I send data to something other than Google Sheets?
Yes — an Outbound Action sends a plain HTTP request, so any endpoint that can receive one works: a CRM, your own server, Zapier, Make.com, or Airtable.
Was this page helpful?
Still stuck? Open a support ticket and our team will help.