
HTTP API Integration in ChatSyncs
How to connect ChatSyncs to any external REST API — configure the endpoint and body, test it, map the response into bot variables, or let the AI API Builder do it for you.
On this page

Chatbot Manager → Integrations → HTTP API connects ChatSyncs to any external REST API (GET, POST, PUT, PATCH, DELETE) — the general-purpose way to hook a bot flow up to a system ChatSyncs doesn't natively integrate with: a CRM, an order tracker, a payment gateway, a booking system, an ERP, or an inventory system.
Add HTTP API#

Real-world example: an e-commerce store wants its bot to answer "Where is my order?" by calling its own Order API.
Customer: Where is my order? Bot: Please enter your Order ID. Customer: ORD12345
The bot sends an HTTP request to the store's Order API and gets back:
{
  "order_id": "ORD12345",
  "status": "Shipped",
  "courier": "BlueDart",
  "tracking_id": "BD987654321"
}
The bot replies:
Your order has been Shipped via BlueDart. Tracking ID: BD987654321
Here's the full four-step setup that makes that possible:
API Details
Enter the API Name (e.g.
Get Order Details), Method (e.g.POST), and API Endpoint URL (e.g.https://api.mystore.com/orders/details).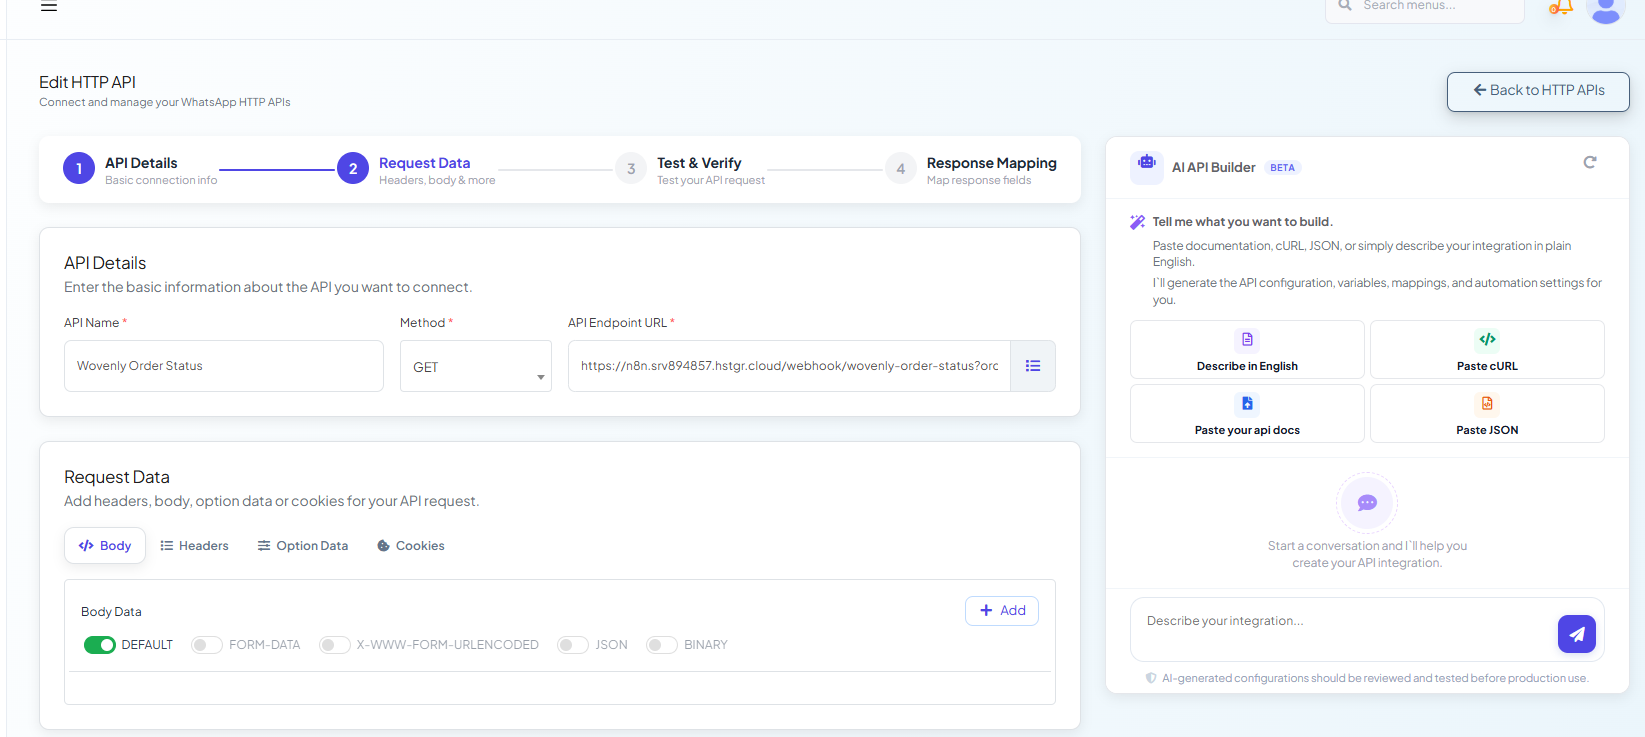
This is a real example: an API called Wovenly Order Status, set to GET, pointed at an endpoint that looks up an order by ID.
Request Data
Choose the request Body format — Default, Form Data, x-www-form-urlencoded, JSON, or Binary.
Use a dynamic variable for whatever the customer typed:
{ "order_id": "{{order_id}}" }If the customer enters
ORD12345, the actual request sent becomes{ "order_id": "ORD12345" }.Add whatever else the API needs:
- Headers — e.g.
Authorization: Bearer YOUR_ACCESS_TOKEN,Content-Type: application/json - Option Data — extra parameters some APIs require, e.g.
language = en,store = bangalore - Cookies — only if the API needs session cookies for authentication; leave empty otherwise
Another real example — a lookup API that needs three pieces of customer data. Each Key (
Name,Number,Email) is set to Type: Dynamic Value, then wired to the matching field ChatSyncs already knows about the subscriber (Full Name, Phone Number, Email) — so the request is built automatically from data already collected in the conversation, with nothing for the customer to retype: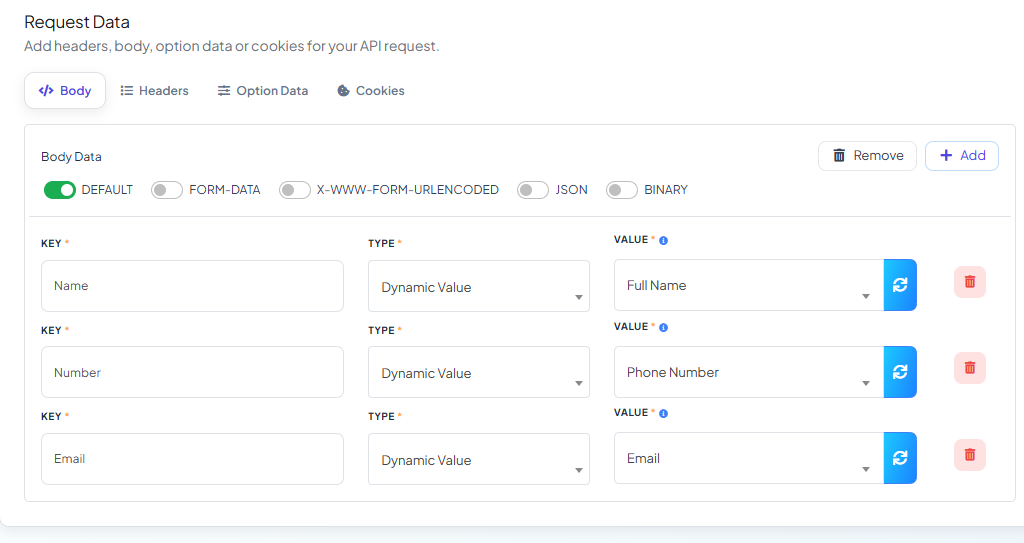
- Headers — e.g.
Test & Verify
Enable Use Sample Data (Recommended) so detected variables get filled with sample values automatically, then click Send Test Request. A working API returns something like:
{
  "order_id": "ORD12345",
  "status": "Delivered",
  "courier": "BlueDart",
  "tracking_id": "BD987654321",
  "delivery_date": "2026-06-28"
}
Don't move on until this test succeeds — an untested endpoint can fail silently mid-flow later.
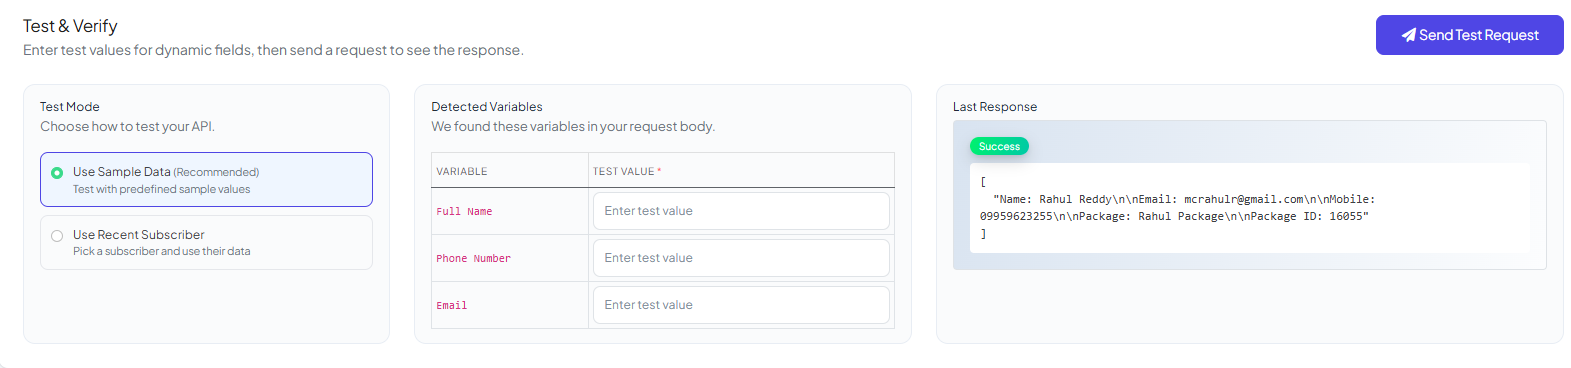
Continuing the Name/Number/Email example from Step 2, ChatSyncs detects the three variables and lets you type in test values, then shows the real response it got back:
Response Mapping
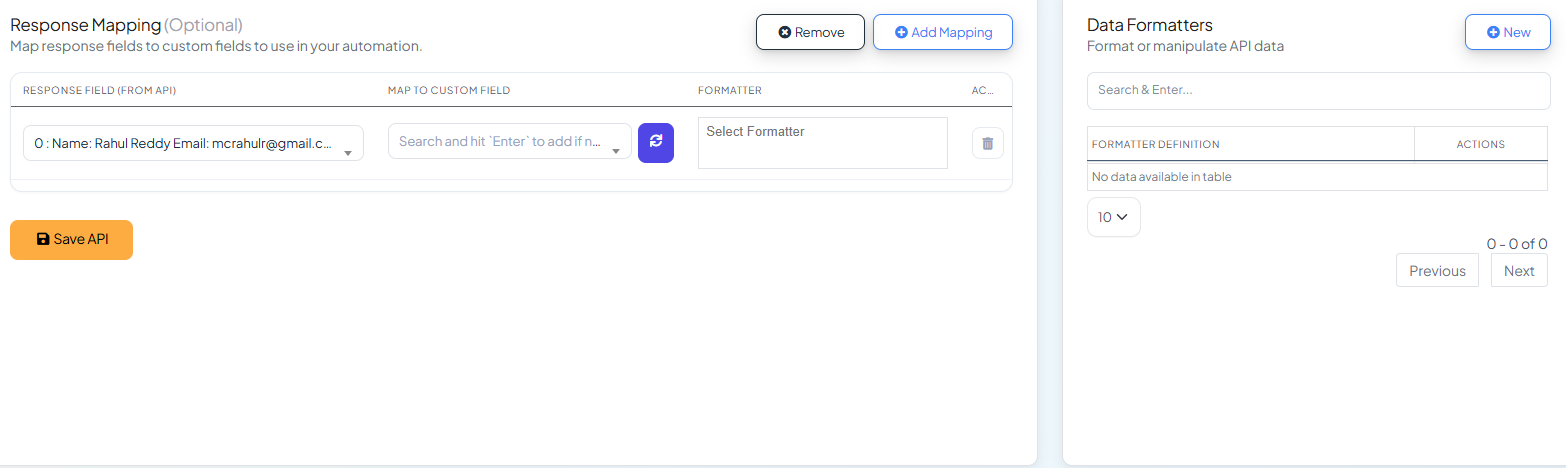
Map each field in the response to a variable the bot can use anywhere:
API Response Variable status{{status}}courier{{courier}}tracking_id{{tracking_id}}delivery_date{{delivery_date}}The bot can now reply with any combination of these:
Your order is {{status}}.
Courier: {{courier}}
Tracking ID: {{tracking_id}}
Delivered On: {{delivery_date}}
which the customer sees as:
Your order is Delivered. Courier: BlueDart Tracking ID: BD987654321 Delivered On: 28 June 2026


Data Formatters#
Next to Response Mapping, the Data Formatters panel lets you transform a mapped field before the bot uses it — for example, reformatting a date, or trimming extra text out of a value the API returned. Click New to create one.

AI API Builder (Beta)#
Instead of manually filling in every field, the AI API Builder panel next to the form can generate the whole configuration for you from one of:
- Describe in English — e.g. "I have an Order API that accepts an Order ID and returns the order status, courier name, tracking ID, and delivery date."
- Paste cURL
- Paste your API Docs
- Paste JSON
The AI fills in the API Endpoint, Request Method, Headers, Request Body, Variables, and Response Mapping automatically.
Complete workflow#
Enter API Details
API Name, Method, and Endpoint URL.
Configure the request
Body format (JSON, Form Data, etc.), Headers, Option Data, Cookies.
Send a test request
Use sample data, then confirm the response looks right.
Map the response
Assign each response field to a bot variable.
Save the API
It's now available to any flow.
Use the mapped variables
Reference them anywhere in your chatbot flow.
Use cases#
- CRM integration — look up or update a customer record.
- Order tracking — the walkthrough above.
- Payment verification — confirm a transaction before continuing a flow.
- Customer lookup — pull account details by phone number or email.
- Booking systems — check availability or confirm a reservation.
- ERP / inventory integration — check stock before promising a delivery date.
Frequently asked#
How do I connect my store's own Order API to my WhatsApp bot?
Use Chatbot Manager → Integrations → HTTP API → Create: enter the endpoint and method, configure the
request body with a dynamic variable like {{order_id}}, test it, then map the response
fields (status, courier, tracking ID, etc.) to bot variables you can use in a reply.
Can I connect an API without manually configuring every field?
Yes — use the AI API Builder (Beta) panel: describe the API in plain English, paste a cURL command, paste its docs, or paste raw JSON, and it generates the endpoint, headers, body, variables, and response mapping for you. Always test the result before using it live.
My HTTP API request needs authentication — where does that go?
Add it under Headers in the Request Data step — most APIs expect something like
Authorization: Bearer YOUR_ACCESS_TOKEN. If the API instead uses session cookies, use the
Cookies section.
Learn From a Use Case#
- Clinic Appointment Booking Automation — an optional extension to connect to an external hospital management system.
- Bank Balance Inquiry Automation — a full request/response call to an external n8n workflow, with Response Mapping driving the reply.
Was this page helpful?
Still stuck? Open a support ticket and our team will help.