
How to Connect Your WhatsApp Account Manually (Alternative Method) in ChatSyncs
The advanced, by-hand way to connect a WhatsApp number to ChatSyncs, for when one-click setup doesn't work — copying a few ID codes from Meta into ChatSyncs yourself.
On this page
- Where this starts and ends: the Alternative panel
- Step 1: Set up the Meta app and get the Business Account ID
- Step 2: Generate the permanent access token
- Step 3: Paste the webhook details back into the Meta app
- Step 4: Add the legal URLs to the Meta app
- Step 5: Finish the connection in ChatSyncs
- Frequently asked
If the one-click signup — How to Connect Your Number to ChatSyncs — won't work for a customer's account, they can connect manually instead.
- Takes more steps than the one-click path.
- Gives full visibility into every ID and code involved — nothing happens automatically behind the scenes.
- The customer creates their own Meta app, then copies a few values from it into ChatSyncs by hand.
Where this starts and ends: the Alternative panel#

From Connect Account in the left navigation, click Connect WhatsApp to open the Business Accounts screen, which shows both connection paths side by side — Embedded Onboarding (One Click), the recommended path, and Create Your Own API Connection, the Alternative path covered here:

Connect Account → Connect WhatsApp → Connect WhatsApp Business (Alternative) is both where this starts and where it ends:
- At the start, copy the Webhook Callback URL, Verify Token, Privacy Policy URL, and Terms of Service URL shown here — they get pasted into the Meta app.
- At the end, come back to this same panel to paste in the WhatsApp Business Account ID and the Access Token, then click Connect.
Step 1: Set up the Meta app and get the Business Account ID#
This video walks through the same two things covered in Steps 1 and 2 below — creating the business portfolio and generating the permanent access token — using Meta's current dashboard, so it's worth watching alongside the screenshots if anything looks different on your screen.
Here you'll create a Meta developer app and pick the WhatsApp option. Think of the business portfolio as the central hub everything else connects through — your Meta app, your WhatsApp number, and later an Instagram or ad account would all attach to this same portfolio, and without it those pieces can't talk to each other. By the end of this step, you'll have the WhatsApp Business Account ID that the Alternative panel is asking for.
Sign in to the developer portal
Go to
developers.facebook.comand sign in, or create an account.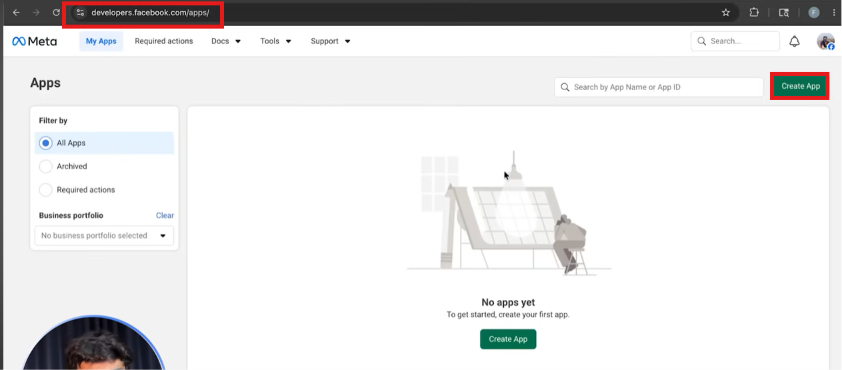
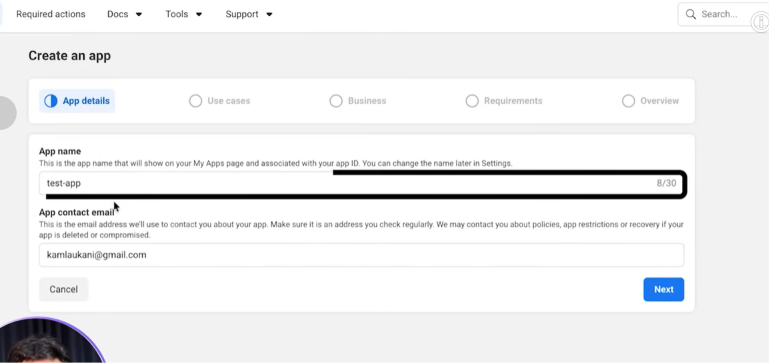
Create an app
Click My Apps → Create App, then give it an App name and App contact email.
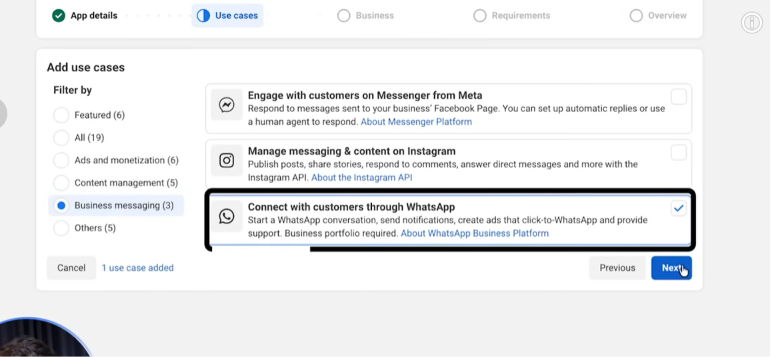
Select the WhatsApp use case
On the Use Cases step, select Connect with customers through WhatsApp.
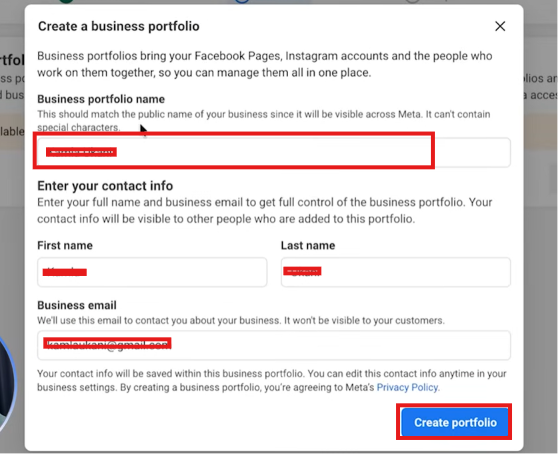
Connect a business portfolio
The app must be attached to a business portfolio. If you don't have one yet, create one on the spot with a portfolio name and your contact info.
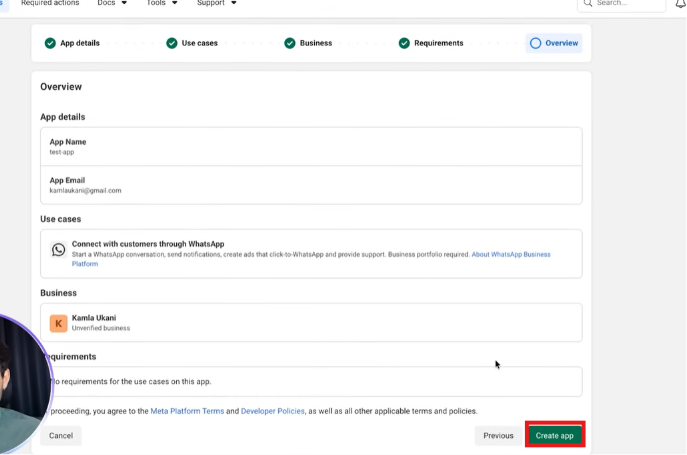
Review and create the app
Confirm the app details, use case, and business portfolio on the Overview step, then click Create app.
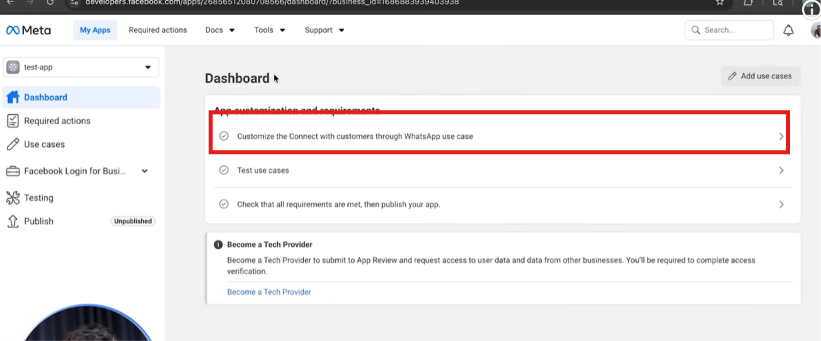
Customize the WhatsApp use case
From the app dashboard, open Customize the Connect with customers through WhatsApp use case.
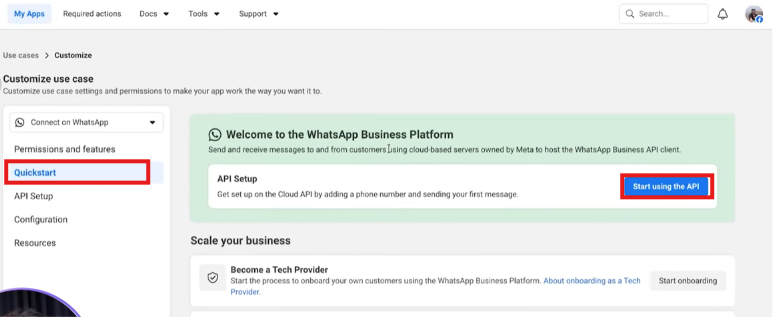
Start using the API
Under Quickstart, click Start using the API — this opens the API Setup screen.
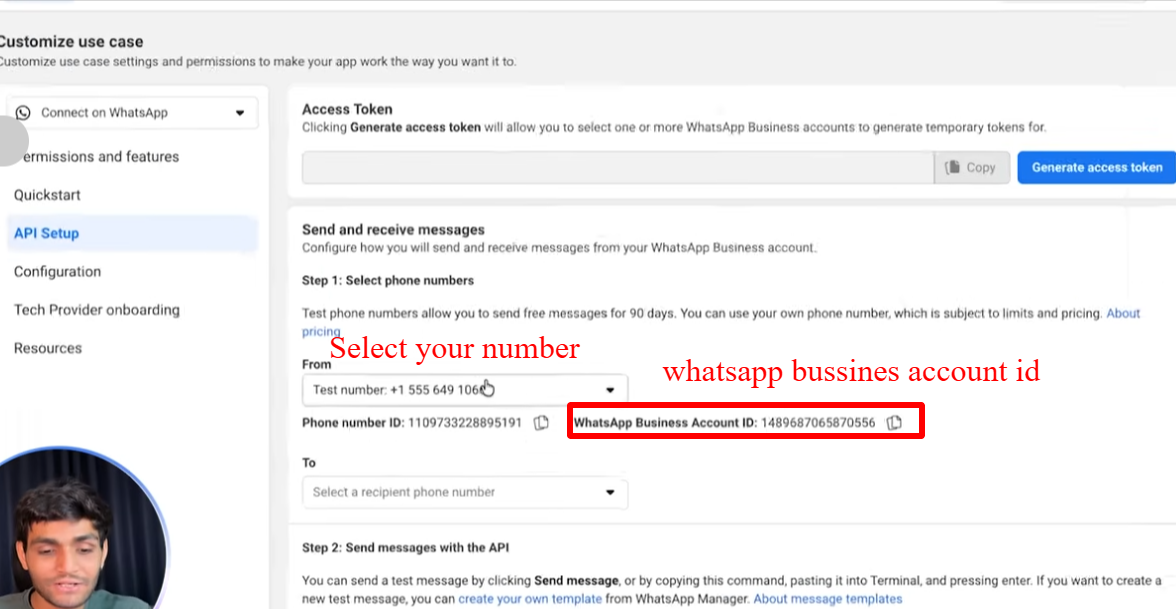
Copy the Business Account ID
Under "Select phone numbers" you'll see a free test number Meta already provided. On the same screen, copy the WhatsApp Business Account ID (WABA ID) shown next to it — that's the value the Alternative panel needs. (The Phone Number ID shown here is for direct API calls, not needed for this connection.)


Step 2: Generate the permanent access token#
In this step, you'll create something Meta calls a system user inside Meta Business Manager, give that system user full access to both your app and your WhatsApp Business Account, and then generate a permanent token from it — this is the second value the Alternative panel is asking for. Make sure you use this permanent token, not the temporary token that Meta's API Setup screen also shows you — that temporary token quietly stops working after about an hour, and your ChatSyncs connection will break without any warning when it does. (See the video above for the same walkthrough in Meta's current dashboard.)
Open Business Settings
Go to
business.facebook.com, open your business portfolio, and click into its Settings.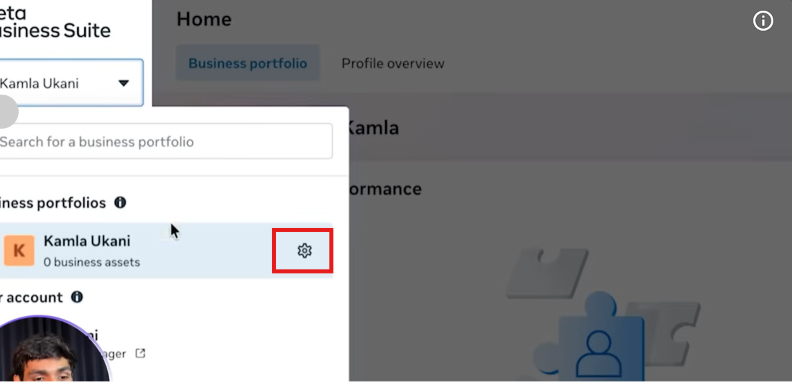
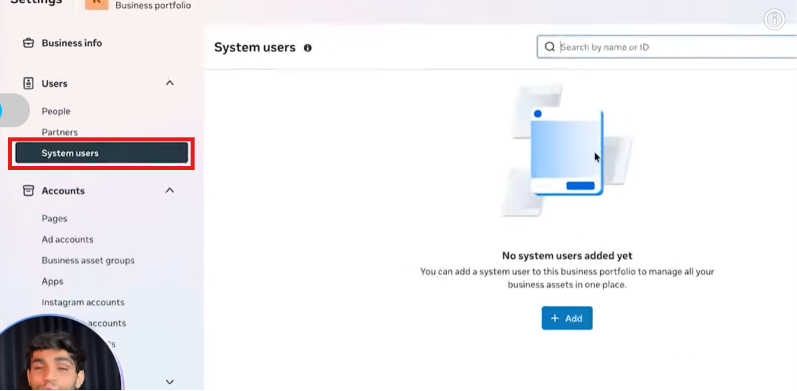
Open System Users
Go to Users → System Users. A new portfolio starts with no system users.
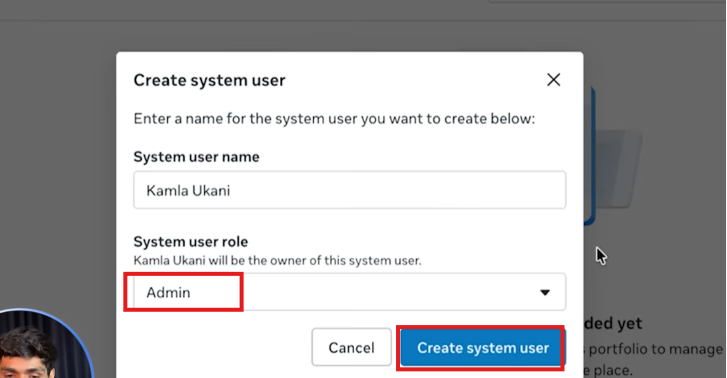
Create a system user
Click Add, give it a name, and set its role to Admin.
Assign assets to the system user
A new system user has no access to anything yet.
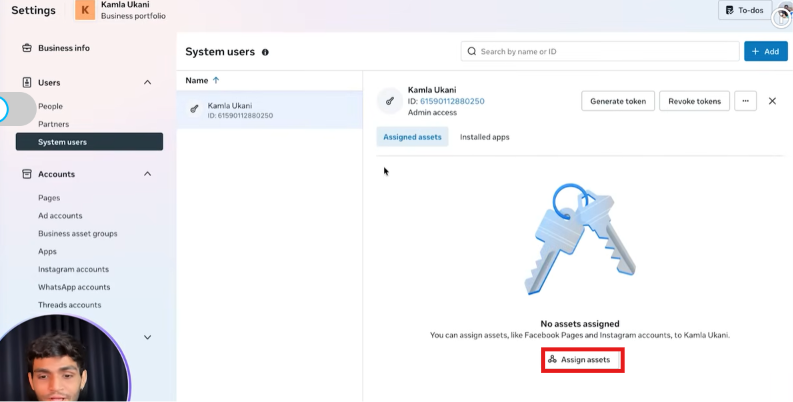
Use Assign assets to give it full control over both the Meta app —
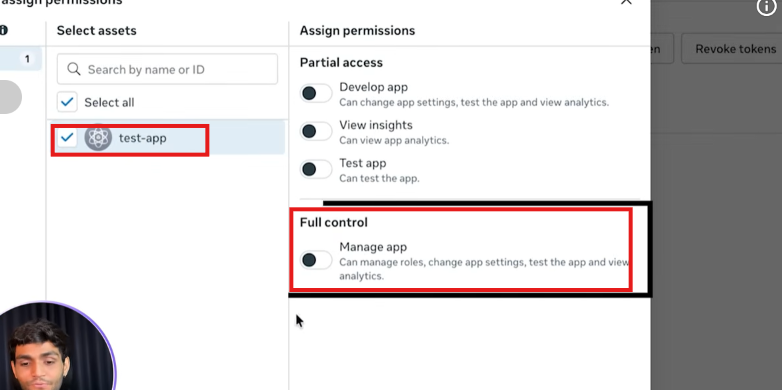
— and the WhatsApp Business Account. Skipping either one causes the token to fail for that asset later.
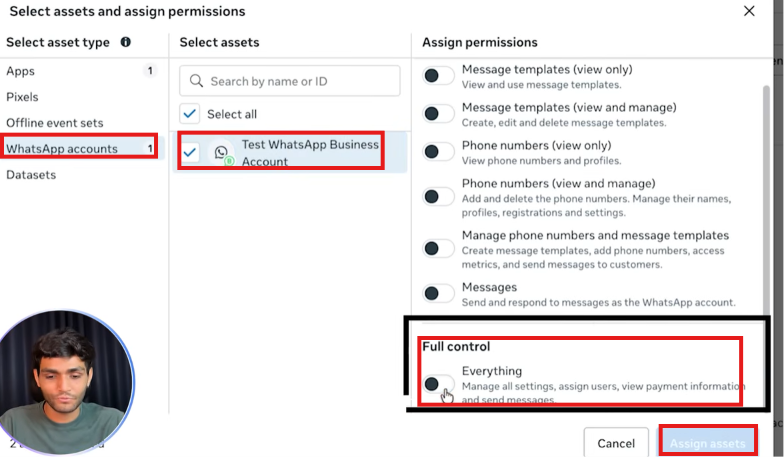
Generate the token
Click Generate token on that system user, select the app, and assign the required permissions (
whatsapp_business_messaging,whatsapp_business_management,whatsapp_business_manage_events).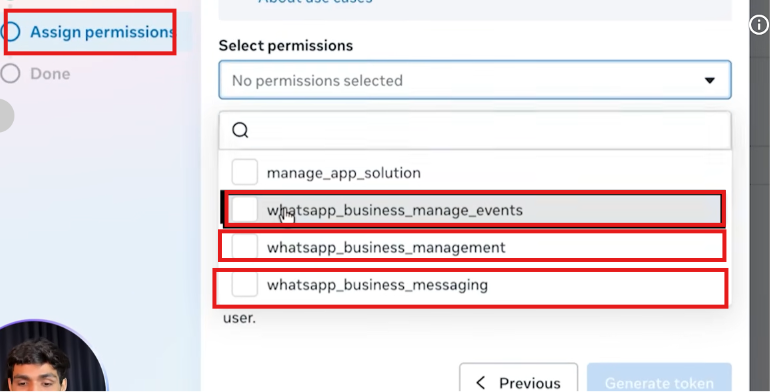
Save it immediately
Copy the token and store it securely — Meta only shows it once. This is the token you'll paste into the ChatSyncs Alternative panel.
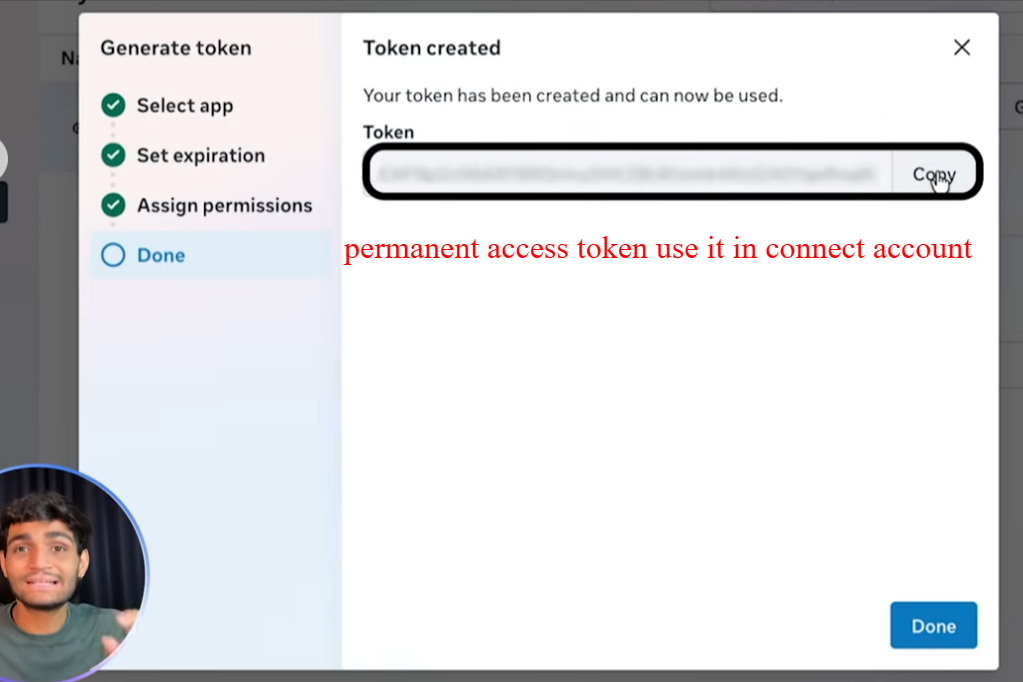
Verify it (optional)
Paste the token into the Meta Access Token Debugger (
developers.facebook.com/tools/debug/accesstoken/) to confirm it's valid — a permanent token shows "Never" as its expiry.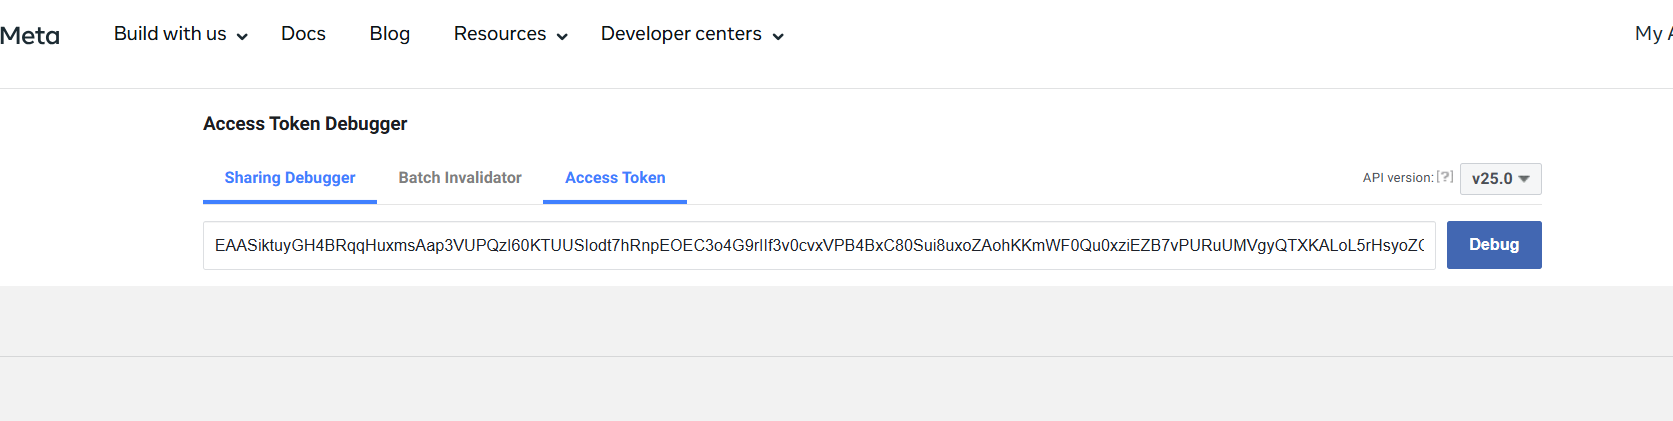


Step 3: Paste the webhook details back into the Meta app#

Open Configuration
In the Meta app, go to WhatsApp → Configuration.
Paste the Webhook Callback URL
Paste the Webhook Callback URL copied from the ChatSyncs Alternative panel.
Paste the Verify Token
Paste the Verify Token copied from the same panel.
Verify and save
Click Verify and save. This is what lets Meta deliver incoming messages to ChatSyncs.
Step 4: Add the legal URLs to the Meta app#

In the Meta app's App Settings → Basic, paste the Privacy Policy URL and Terms of Service URL copied from the ChatSyncs Alternative panel, then save. Meta won't let the app go live without both.
Step 5: Finish the connection in ChatSyncs#
Back in the ChatSyncs Alternative panel, paste in the WhatsApp Business Account ID (Step 1) and the Access Token (Step 2), then click Connect.
Frequently asked#
Embedded signup isn't working for a customer — what's the alternative?
Use Connect WhatsApp Business (Alternative). It takes more steps because the customer creates their own Meta app and system-user token, but it gives full visibility into every credential involved.
What two values does the Alternative panel actually need from Meta?
The WhatsApp Business Account ID (from API Setup in the Meta app) and a permanent access token (from a system user in Meta Business Manager). Both come from the Meta side before you can click Connect.
Why does the connection fail even with a correct Business Account ID and token?
Usually the webhook step was skipped or the system user was never assigned full control over the app and the WhatsApp account. Check Access Tokens for the asset-assignment step.
Was this page helpful?
Still stuck? Open a support ticket and our team will help.